Step Two: Center Section Face Pieces
After rewarding yourself for making it through Step One, the next thing to do is switch the Top and Bottom faces by doing a 4D rotation. One way you can do this is to hold down the control key and click anywhere on the Lower face twice. The blue face is now this invisible Bottom face (This also made the orange face the Upper face and the cyan face the Lower face). The fact that the blue face is invisible is only to our advantage, as we don?t want or need to think about the face pieces we have already placed.
All the unsolved face pieces will be visible at this point. Our objective for StepTwo is to solve 11 of the 12 face pieces in the center section. We need to leave one unsolved, which I am going to call the ?keyhole? piece. The choice of which piece to use as a keyhole is irrelevant. We simply need one unsolved piece so that we can manipulate face pieces on the new (green) Top face in Step Three.
Now is the time when we get to use our first predefined sequence of moves, our first Series!! For this step you will be using the Two-Color Series.
Understand that Series now!? Ok, lets keep moving?
The thinking part of this step will be finding pieces on the Top face that can be moved into their correct position and orientation in the center section. Since our current Top face is green, all face pieces that belong in the center section of the cube do not have green in them. So first find a piece on the Top face with no green in it (no green in either of the two colors). Notice that we can do any twist of the top face without disturbing face pieces in the center section of the puzzle. Once you find a piece that belongs in the center section, take advantage of this fact and do twists of the Top face to get it within one twist of where it belongs in the center section.
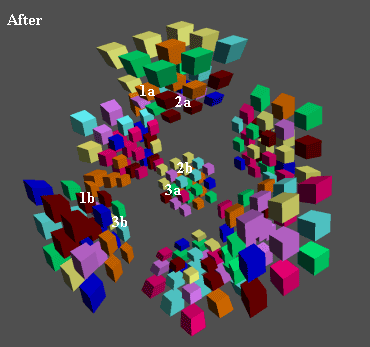
Our cube looks as below. If I label the pieces as shown and use the Two-Color Sequence, the #1 piece (red/orange) in the top layer will end up in its correct position and orientation.


Just for reference, the actual moves in this case are
| Front, | 15, | Left | |
| Upper, | 15, | Right | |
| Front, | 15, | Right | |
| Upper, | 15, | Left |
But understanding the sequence and how to apply it is most important.
Note the importance of orientation in the Two-Color Sequence. I could not have labeled the red/orange piece a #3 and the yellow/purple piece a #1, for instance. If I had done that, the red/orange piece would be in its proper position, but incorrect orientation.
During this portion (all all portions for that matter) of the cube solution, don?t be shy with the 3D rotations to move your view around and see what is going on. You can do a 3D rotation by clicking anywhere but on a sticker with the left mouse button and dragging around. Depending on your view, this will change the face locations (excluding the Top and Bottom face). For instance, you could do a 3D rotation such that the cyan face is no longer the Lower face.
Although face pieces from the bottom layer (face pieces where one of the colors are blue) will become visible during a Two-Color Series, the series will ultimately return them to their original position. If you are working on this portion of the cube and notice that the blue sticker of a face piece has worked its way into visibility, you have made an error and may need to redo your cross.
Also, after solving most of the center section face pieces, it may happen that you have no face pieces without green in them in the top layer, yet you still haven?t placed all the face pieces in the center section. In this case, do a Two-Color Series on one of the incorrectly placed center section face pieces to get it to the Top face. You can then proceed as before to get this piece into its proper position and orientation in the center section of the cube.

