Step Three: Top Face Face Pieces
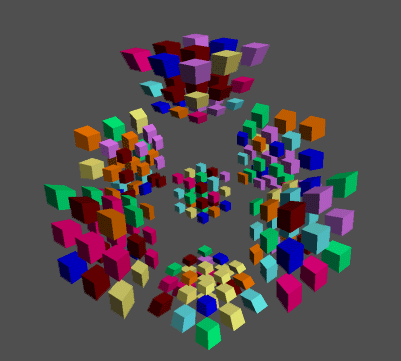
Confusing section title, but that is what they are ? the Top face face pieces. At this point, the cube looks like this.

I have label the keyhole with a #1. This is the only unsolved face piece in the center section of the cube. With the 6 unsolved on the Top face, that makes 7 pieces we have left to solve to finish placing all of the face pieces. On your cube, some of the pieces on the Top face may very well already be solved at this point. That?s great.
To manipulate the pieces on the top face, we can use the Two-Color Series, with our keyhole piece and two additional pieces on the top face.
Another very powerful tool during Step Three is ?replacement moves?. I use these much more than the Two-Color Series. Unfortunately, when I?ve taught the 3D cube, this has been a source of confusion, but I hope I can get the idea across. The most important thing to understand is that the replacement moves MUST have a corresponding move that undoes them. The steps for replacement moves are as follows.
1. Replace a face piece on the Top face with the face piece in the keyhole position using a single twist.
2. Do any set of twists of the Top face.
3. Undo the original replacement move.
When the replacement is done in (1), some other face pieces (including one from the Bottom face) are moved out of position. (3) is necessary to move these pieces back into their correct position. But before we do that, we execute (2) which is what allows us to manipulate which pieces are getting moved around. Still, a corresponding (3) must always accompany a (1), and so I think of those moves as always being paired together.
It is important to also remember that before (and after) we execute a replacement move sequence, we can do any twist of the Top face without altering any face pieces except those on the Top face.
Lets apply these ideas to the cube above. First, note that doing
| Top, | 11, | Left |
is to our advantage because it lines up two more pieces (the green/purple and the green/orange). We have four more pieces in the Top face to place. Lets do one of them using a replacement move sequence.
The piece we are going to place will be the one in the keyhole, in this case the green/red piece. As is, it is not possible to do a single twist to get this piece where it belongs. The green/red piece belongs where the green/pink piece lies in the figure above. But if we make the following preliminary twist
| Top, | 15, | Left |
so that the cube looks like this

we can use a set of replacement moves as follows:
| Front, | 11, | Left | (1) Replace the green/pink with the green/red | |
| Top, | 15, | Right | (2) Twist the Top face | |
| Front, | 11, | Right | (3) Undo (1) |
Here is the result.

There was a lot going on in those moves and I want to point out a few of the highlights.
First, the green/red piece has been placed, which was our goal. In addition, the green/orange and green/purple pieces were not disturbed.
Normally, after doing the replacement moves, additional twists of the Top face are required to undo any preliminary twists and any twists done in (2). Since (2) happened to be the opposite of our preliminary twist in this case, we did not have to do that. That, however, is not the norm.
I also want to point out an important aspect of (2). Whatever piece takes the place of the old keyhole during (2) will be the piece that ends up being the new keyhole after (3). Why is this important? Up until the last set of replacement moves, we want the keyhole piece to have green as one of its colors. This is so we can have a piece to place in the next set of replacement moves. To explain further, there are a variety of moves we could have chosen for (2) above, but we would not have wanted it to be
| Top, | 11, | Left |
If this had been the (2) move, then (3) would have put the pink/cyan piece into the keyhole position, effectively removing our keyhole before all the Top face face pieces had been placed.
As we continue, the 4D thinking required will become more intense. Use replacement moves and the Two-Color Series to finish the Top face face pieces. It can work out in many different ways. Philip enumerated all the possible scenarios on the Top face for the 3D cube. I am not going to do that here, but if you understand how to apply what I?ve described, you will have no problem. When done, it looks like this.


